
A basement can be transformed into the perfect creative space, providing an environment dedicated to crafting and hobbies. Unlike other parts of the home, basements often offer privacy, less noise, and a larger open area where you can organize your materials and tools without disruption. Whether you enjoy painting, woodworking, sewing, or paper crafts, having a dedicated craft studio helps improve focus, inspires creativity, and keeps your home organized.

Planning a basement craft studio requires careful consideration of space, lighting, ventilation, and storage. You need to think about the type of craft you enjoy most and the materials and tools it requires. Proper preparation ensures safety, comfort, and efficiency in your studio. From setting up a workspace to organizing your supplies and adding personal touches, a well-designed basement craft studio can become a favorite retreat in your home.
This guide provides ten practical basement craft studio ideas. Each idea includes details about setup, materials, tools, and tips for creating an inspiring environment. Whether you are a beginner or an experienced crafter, these ideas will help you maximize your basement space and turn it into a functional and enjoyable studio.
1. Painting and Drawing Studio
A painting and drawing studio is ideal for artists who need a quiet, dedicated space to work. In a basement, you can easily control lighting and avoid glare from windows. Begin by choosing a large, sturdy table or easel for your work. Adjustable easels are especially useful for painting at different angles.
Materials for this studio include canvases, sketchbooks, paints (oil, acrylic, or watercolor), brushes, palettes, and pencils. Keep paints in labeled containers and organize brushes by type to save time. Installing shelves or cabinets along the walls can help store your art supplies neatly. Consider adding a drying rack for finished paintings to prevent smudges or accidental damage.
Lighting is crucial in an art studio. Use bright, adjustable LED lights to mimic natural light. A comfortable chair and a small rug can make long sessions more pleasant. If space allows, include a sink or water source to clean brushes and palettes efficiently. Personalize the studio with inspiring artwork, mood boards, or photos to keep your creative energy high.

2. Sewing and Fabric Studio
A sewing and fabric studio is perfect for anyone interested in fashion, quilting, or DIY home décor projects. The basement provides a large, uninterrupted space for cutting fabric, sewing, and storing materials. Start by setting up a sturdy sewing table and a comfortable chair. Include a cutting table if possible, as it makes working with large fabrics much easier.
Materials needed include sewing machines, threads, needles, scissors, measuring tapes, pins, and various types of fabric. Use wall-mounted shelves, drawers, or bins to store fabrics and tools in an organized manner. Labeling each storage unit can save time when searching for supplies. Consider a small ironing station with an ironing board and iron, as pressing fabrics is essential for professional-looking projects.
Good lighting is important, especially task lighting directly above your work areas. If the basement has limited natural light, add bright overhead lights or desk lamps. You can also use a pinboard or magnetic board for patterns, inspiration, and notes. This setup helps keep your projects organized and ensures a productive crafting environment.

3. Woodworking Workshop
A basement woodworking workshop allows you to create furniture, home décor, or small wooden crafts in a controlled environment. Begin by installing a solid workbench and comfortable stools or chairs. Ensure that your work area has enough space for both large projects and smaller detail work.
Necessary tools include saws, hammers, drills, sanders, clamps, measuring tools, and woodworking materials such as different types of wood. Safety equipment like goggles, gloves, and ear protection is essential. Install storage shelves or tool racks to keep your workspace tidy and efficient. For sawdust management, consider a small vacuum or dust-collection system to keep the basement clean.
Lighting is especially important for precision work, so combine overhead lighting with adjustable lamps for detailed projects. Ventilation is critical in a basement woodworking studio, as dust and fumes can accumulate quickly. Use a fan or portable air purifier to maintain air quality. You can also display finished projects on shelves to inspire future work and enhance the space visually.

4. Jewelry Making Studio
Creating jewelry requires a detailed, organized workspace where you can focus on small, intricate tasks. Set up a sturdy table with a smooth surface for cutting, shaping, and assembling jewelry pieces. Include storage solutions such as drawers, small containers, and bead organizers to keep materials sorted by type and color.
Materials needed include beads, wires, pliers, clasps, chains, resin, and molds for specialized pieces. A magnifying lamp helps with precision work, while bright overhead lighting ensures colors are accurate. If your craft involves resin or soldering, make sure to have proper ventilation and safety equipment.
A jewelry studio benefits from tools like a small soldering iron, wire cutters, crimping tools, and polishing machines. Wall-mounted organizers or pegboards are useful for hanging frequently used tools. Personal touches, such as inspirational images or completed pieces on display, can make the studio more inviting. A small seating area allows you to relax while planning designs or teaching others.

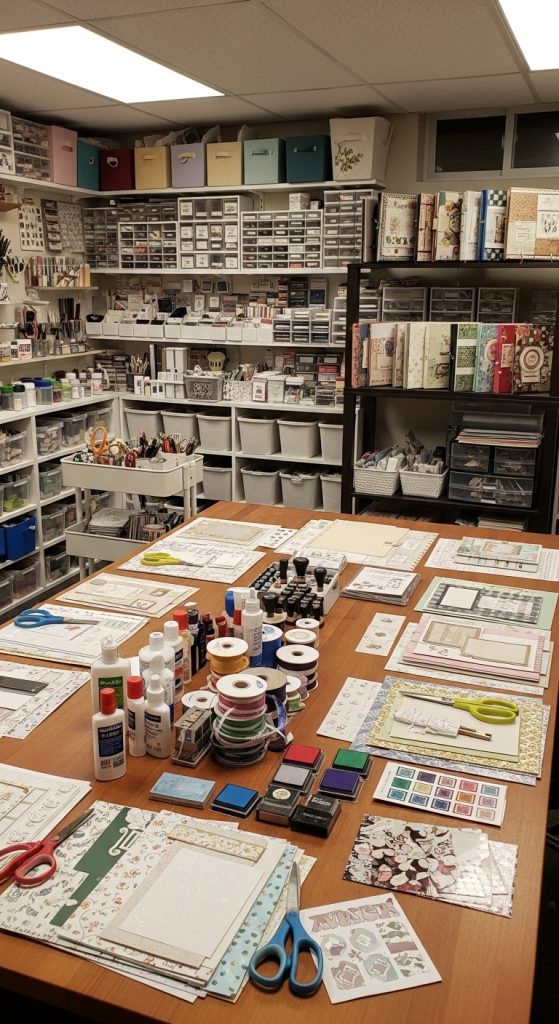
5. Scrapbooking and Paper Craft Studio
A basement scrapbooking or paper craft studio is perfect for creating cards, journals, or memory books. Start with a large table where you can spread out paper, scissors, glue, and decorative elements. Storage for paper, stamps, stickers, and embellishments is essential to keep the space organized.
Materials include cardstock, patterned paper, glue sticks, scissors, cutting tools, stamps, inks, and ribbons. Use vertical storage, drawers, or bins to separate supplies by color, type, or project. Consider a rolling cart for frequently used tools, making them easily accessible without cluttering your main work area.
Good lighting is important for detailed designs, so combine overhead lights with desk lamps. A comfortable chair and mat for your feet make long crafting sessions more enjoyable. Display completed scrapbooks or projects on shelves or in frames for inspiration. This type of studio encourages creativity while keeping all materials neatly organized for easy access.
6. Pottery and Clay Studio
A pottery or clay studio requires a space where you can mold, shape, and fire clay pieces. While basements often have limited ventilation, you can still set up a small clay workspace with careful planning. Begin with a sturdy table, a clay wheel if needed, and shelving for drying pieces.
Materials include clay, sculpting tools, glazes, brushes, and water containers. Storage for finished pieces should allow air circulation to prevent cracking. If you plan to fire pottery, consider a small electric kiln and ensure proper electrical setup and heat-resistant flooring. Gloves and aprons help protect clothing and hands during messy projects.
Lighting is crucial to see details while shaping clay. Task lighting and overhead lights improve visibility. A small sink or water source is helpful for cleaning tools and hands. Finished pieces can be displayed on shelves to inspire your next creations and make the studio visually appealing.

7. Candle and Soap Making Studio
A candle and soap making studio is ideal for anyone interested in homemade gifts or small-scale production. Begin by designating a table with heat-resistant surfaces. Include storage for molds, wax, oils, fragrances, and soap dyes.
Materials include wax, wicks, molds, essential oils, fragrances, soap bases, and colorants. Use containers for storing liquids and powders safely. Protective gloves, aprons, and heat-resistant tools are necessary for safety. Good ventilation is critical when melting wax or heating soap mixtures to prevent inhalation of fumes.
Lighting should be bright for detailed work, and shelves or cabinets help organize molds, finished products, and ingredients. You can display finished candles and soaps on shelves to encourage creativity. A small sink or basin nearby simplifies cleanup. This studio allows for experimentation with scents, shapes, and colors, making crafting fun and satisfying.

8. Model Building and Miniatures Studio
A model building or miniatures studio requires a quiet, organized space for assembling intricate models. Start with a large table with smooth surfaces for cutting and assembling pieces. Good storage is essential for tiny parts, paints, and tools.
Materials include model kits, glue, paint, brushes, files, and small cutting tools. Small containers, trays, or compartment organizers help keep tiny pieces sorted. A magnifying lamp improves precision work, while bright overhead lighting ensures color accuracy. Protective mats on tables help prevent damage to both the workspace and finished models.
Display shelves or glass cabinets showcase completed models and inspire future projects. Comfortable seating and ergonomic arrangements are important for long work sessions. A well-organized studio reduces the risk of losing small parts and makes model building more enjoyable and efficient.

9. Leatherworking Studio
Leatherworking requires a dedicated space for cutting, dyeing, and stitching leather. Start by setting up a sturdy workbench with plenty of surface area. Include storage for tools, leather pieces, dyes, and threads.
Materials include leather hides, cutting tools, mallets, needles, thread, rivets, dyes, and stamps for designs. Organize tools in wall-mounted racks or drawers for easy access. Good lighting is important for precise stitching and detailing, so combine bright overhead lights with task lamps. Gloves and aprons protect hands and clothing during messy projects.
Consider a small press or stitching pony for more complex tasks. Finished items can be displayed on shelves or hooks for inspiration. Proper ventilation is necessary when using dyes or adhesives. A leatherworking basement studio allows for creativity while keeping all materials neatly arranged and accessible.

10. Mixed Media and DIY Studio
A mixed media and DIY studio is ideal for crafters who like to experiment with different materials and techniques. Set up a large central table for projects and surrounding shelves or cabinets for supplies.
Materials can include paints, papers, fabrics, beads, glue, and various crafting tools. Label storage containers for easy organization and include bins for scraps and recycling. A rolling cart with essential tools allows flexibility and quick access during projects. Lighting is critical, with bright overhead lights and adjustable task lamps to ensure visibility across multiple media.
A comfortable chair and floor mat make long crafting sessions easier. Display areas for completed projects encourage creativity and motivation. Ventilation is important if your projects involve glues, paints, or other chemicals. This type of studio encourages exploration, allowing you to combine techniques like painting, sewing, and paper crafts in one dedicated space.
