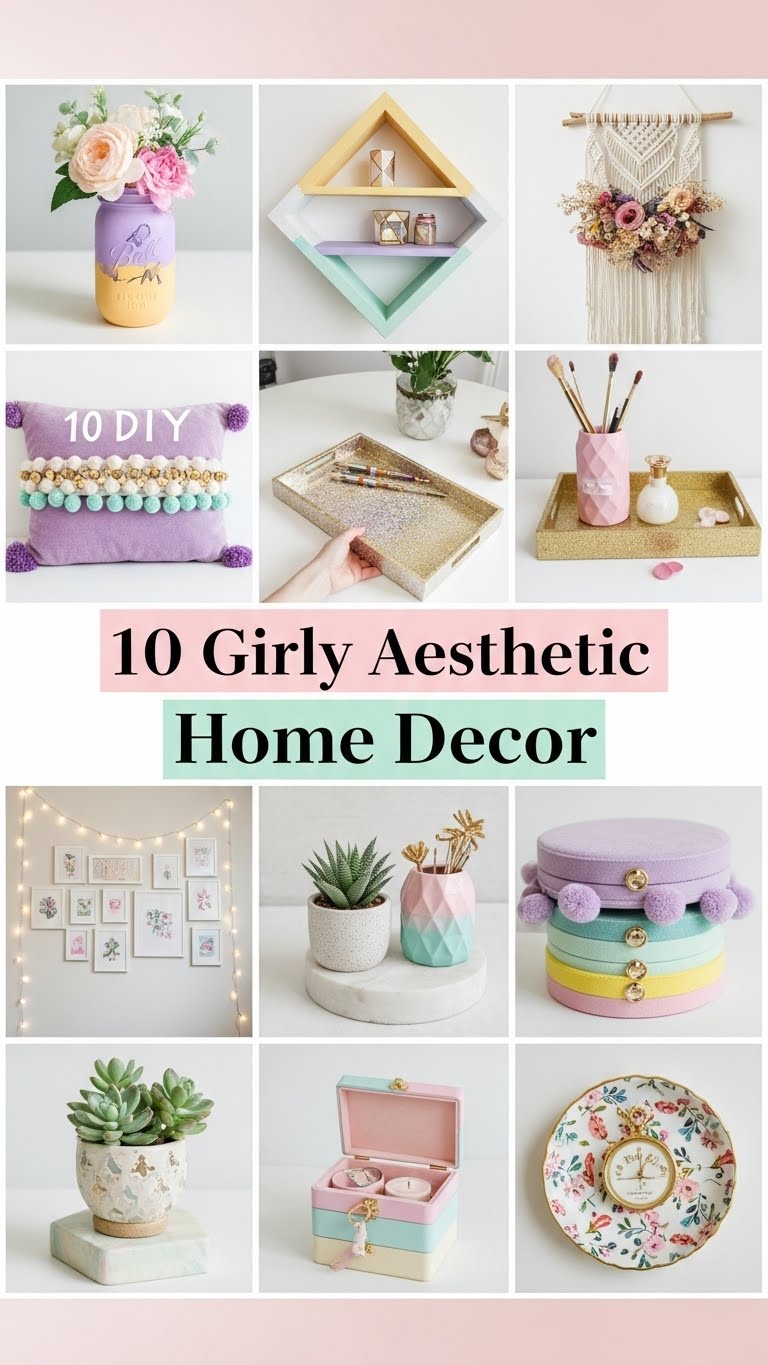
Decorating your room in a girly aesthetic does not require expensive items or professional help. With some creativity and DIY spirit, you can transform your space into a cozy, chic, and feminine haven. Below are 10 detailed DIY ideas, complete with preparation, materials, and step-by-step instructions.

1. Handmade Macrame Wall Hanging
Macrame wall hangings add a soft and feminine touch to any room. They are versatile and can serve as a focal point above your bed, desk, or couch.
Materials Needed: Cotton cord, wooden dowel, scissors, tape measure, optional beads.
Preparation: Measure your wall space to decide the size of the hanging. Cut the cord into equal lengths, usually four times the desired length of the final piece.
Steps:
- Secure the dowel on a flat surface or tape it to a wall.
- Fold cords in half and loop them around the dowel using a lark’s head knot.
- Begin knotting in patterns such as square knots or half hitch knots.
- Add beads if desired for a decorative touch.
- Trim the ends to create a neat fringe or angled design.
Tips: Start with simple patterns if you are a beginner. Macrame adds texture and softness, making your room feel cozy and inviting.

2. DIY Floating Shelves with Fairy Lights
Floating shelves are functional and stylish, and adding fairy lights gives a girly and whimsical vibe.
Materials Needed: Wooden planks, wall brackets, screws, drill, fairy lights, optional paint or stain.
Preparation: Choose the wall where you want to place your shelves. Decide the number and spacing of shelves.
Steps:
- Sand and paint or stain the planks if desired.
- Fix brackets to the wall using screws and a drill.
- Place planks on the brackets.
- Arrange fairy lights along the edge or drape them over the shelf.
- Decorate with small plants, frames, or cute figurines.
Tips: Opt for pastel colors to enhance the girly aesthetic. The combination of shelves and lights creates a dreamy, feminine atmosphere.

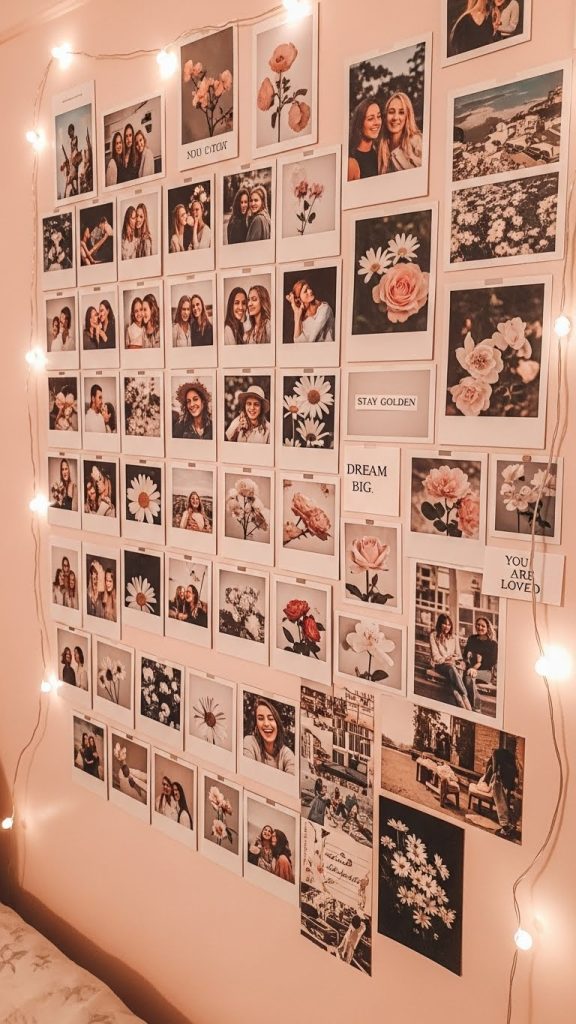
3. Personalized Photo Collage Wall
A photo collage wall personalizes your space and makes it feel intimate and cozy.
Materials Needed: Photos, scissors, adhesive or washi tape, string lights, optional clipboards.
Preparation: Select your favorite photos and decide on a layout. You can mix Polaroids, prints, and postcards.
Steps:
- Cut or crop photos for uniformity.
- Use tape or adhesive to attach photos directly to the wall, or hang them on string lights with clips.
- Arrange in grids, clusters, or random patterns.
- Add fairy lights or decorative frames around the collage for an extra aesthetic touch.
Tips: Change photos seasonally to refresh the look. A collage wall becomes a focal point of your room and reflects your personality.
4. DIY Resin Jewelry Dish
A resin dish adds a chic and functional element to your room, perfect for holding jewelry or small trinkets.
Materials Needed: Epoxy resin, silicone mold, gloves, mixing cups, glitter or dried flowers.
Preparation: Select a mold that suits your space and gather embellishments.
Steps:
- Mix the resin according to instructions.
- Add glitter, mica, or dried flowers to the resin.
- Pour into the mold and remove bubbles with a heat gun or torch.
- Let it cure for 24-48 hours.
- Remove from the mold and sand edges if needed.
Tips: Choose pastel or iridescent colors to match a girly aesthetic. Resin dishes are small projects that elevate desk or dresser decor.

5. DIY Cute Planters with Pastel Paint
Plants bring life and freshness, and decorating planters can enhance the girly theme.
Materials Needed: Plain ceramic or terracotta pots, acrylic paint, paintbrushes, optional stickers or washi tape.
Preparation: Clean pots thoroughly. Decide on a color palette.
Steps:
- Paint the base coat on the pot and let it dry.
- Add patterns such as polka dots, stripes, or hearts.
- Seal with a clear varnish for durability.
- Plant succulents, flowers, or greenery of your choice.
Tips: Use soft pastel colors like pink, lavender, or mint green. Decorated planters make shelves, desks, or bedside tables more visually appealing.

6. DIY Tassel Garland
Tassel garlands are playful and girly, perfect for hanging above your bed or along a wall.
Materials Needed: Yarn in pastel colors, scissors, string, tape measure.
Preparation: Decide the length of the garland and the number of tassels required.
Steps:
- Cut yarn into uniform lengths.
- Fold each bundle and tie near the top to form a tassel.
- Trim the bottom to make it even.
- Attach tassels to the string, spacing them evenly.
- Hang using nails or removable hooks.
Tips: Mix different colors and sizes of tassels to create a dynamic look. Tassel garlands are budget-friendly and transform a plain wall instantly.

7. DIY Decorative Cushions
Custom cushions add comfort and a personal touch to your room.
Materials Needed: Fabric, sewing machine or needle and thread, stuffing, fabric paint or embroidery supplies.
Preparation: Choose fabrics that complement your room’s color scheme. Measure and cut fabric pieces for the cushions.
Steps:
- Sew the fabric pieces together, leaving a gap for stuffing.
- Stuff with cotton or synthetic filling.
- Close the opening with hand stitching or machine sewing.
- Add decorative elements like embroidery, fabric paint designs, or lace trims.
Tips: Mix patterns and textures such as velvet, lace, or cotton for a layered look. Cushions make your room cozier and visually appealing.

8. DIY Wall-Mounted Jewelry Organizer
A jewelry organizer keeps your accessories in order while serving as decor.
Materials Needed: Wooden board, small hooks or knobs, paint, drill, optional frame.
Preparation: Determine the size and layout based on your jewelry collection.
Steps:
- Paint the wooden board in a pastel color.
- Attach hooks or knobs evenly for hanging necklaces, bracelets, or earrings.
- Optional: Add a frame for a polished look.
- Mount on the wall at a convenient height.
Tips: Use gold or rose gold hooks for a more feminine aesthetic. This organizer doubles as wall art.

9. DIY Ribbon Curtain Tiebacks
Ribbon tiebacks elevate the look of your curtains while adding a soft, girly touch.
Materials Needed: Ribbon in pastel shades, scissors, hot glue, optional decorative beads or charms.
Preparation: Measure the circumference of your curtains to determine ribbon length.
Steps:
- Cut two equal lengths of ribbon for each curtain panel.
- Glue ends together to form a loop or add decorative beads.
- Wrap around the curtain and secure in place.
- Adjust folds for a neat look.
Tips: Layer ribbons in different shades for added charm. These tiebacks make curtains look more styled and feminine without major changes.

10. DIY Glitter Vases
Glitter vases add sparkle and glamour to your room, perfect for fresh flowers or decorative branches.
Materials Needed: Glass vases, glitter, Mod Podge or clear glue, brush.
Preparation: Clean the vase to remove dust or grease.
Steps:
- Apply glue to the exterior of the vase using a brush.
- Sprinkle glitter evenly, covering the entire surface.
- Shake off excess glitter and let dry completely.
- Optional: Seal with clear spray varnish for durability.
Tips: Use pastel or metallic glitter to maintain a soft, feminine theme. Glitter vases catch light beautifully, adding a touch of glamour to any corner of the room.
