
Building a wooden bird feeder at home is a rewarding and creative project. It allows you to attract beautiful birds to your garden while also improving your woodworking skills. A DIY wooden bird feeder is not only practical but also eco friendly and cost effective. Instead of buying a ready made feeder from the market, you can design one that matches your outdoor space and meets the needs of local birds.

Wood is one of the best materials for bird feeders because it is natural, strong, and easy to work with. With simple tools and basic materials, anyone can create a feeder that lasts for years. You can choose from simple tray designs to more decorative house shaped feeders. Each style offers different benefits, depending on the type of birds you want to attract.
In this blog post, you will discover 10 DIY wooden bird feeder ideas. Each idea includes preparation tips, materials needed, and step by step guidance. The language is simple and clear so beginners can easily follow along. Whether you are working alone or with family, these projects can turn your backyard into a peaceful bird watching space.
1. Simple Platform Bird Feeder
A simple platform bird feeder is perfect for beginners. This design is flat and open, making it easy for birds to land and eat comfortably. It works well for attracting sparrows, robins, and finches.
Materials needed include a wooden board for the base, four small wooden strips for edges, nails or screws, sandpaper, wood glue, and a drill. You may also need a chain or rope if you plan to hang it.
Start by cutting a square or rectangular wooden board. Sand all edges to remove rough surfaces. Attach the wooden strips along the edges of the base to prevent seeds from falling off. Make sure to leave small gaps at the corners for water drainage. Drill holes at each corner if you want to hang it with rope or chain.
This feeder is easy to clean because it has an open design. Place it in a visible area in your garden. Add mixed bird seeds and watch birds gather quickly. Apply a non toxic outdoor wood sealant to protect it from rain and sunlight.

2. Wooden House Style Bird Feeder
A wooden house style bird feeder adds charm to your backyard. It looks like a tiny house with a roof and feeding area below. This design protects seeds from rain and wind.
You will need plywood for the base and walls, wooden panels for the roof, nails or screws, wood glue, drill, and sandpaper. Optional materials include outdoor paint and a hook for hanging.
Begin by cutting the base and four side walls. Attach the walls securely using screws and glue. Leave open sides so birds can enter easily. Next, attach two slanted wooden panels to create a roof. The slanted roof allows rainwater to slide off.
Make sure the feeder has drainage holes at the bottom. Sand all surfaces for safety. You can paint the exterior with weather resistant paint, but avoid painting inside areas where birds will eat.
This style works well in gardens with trees. Hang it from a branch or mount it on a pole. It provides shelter and keeps bird food dry for longer periods.

3. Window Mounted Wooden Bird Feeder
A window mounted wooden bird feeder allows you to watch birds closely from inside your home. It is a great option for apartments or houses with limited garden space.
Materials required include a small wooden box, clear acrylic sheet, strong suction cups, screws, drill, and wood glue. The acrylic sheet acts as a viewing window and protects seeds from spilling.
Build a small rectangular wooden box with one open side facing your window. Attach the acrylic sheet at the front to keep seeds inside while still allowing birds to feed from the open top. Secure suction cups at the back of the feeder.
Before attaching it to the window, make sure the surface is clean. Press the suction cups firmly onto the glass. Add bird seeds and wait patiently.
This design requires regular cleaning because it is close to your living space. Always check that the suction cups are strong enough to hold the feeder safely. It is a wonderful way to enjoy bird watching from your chair.

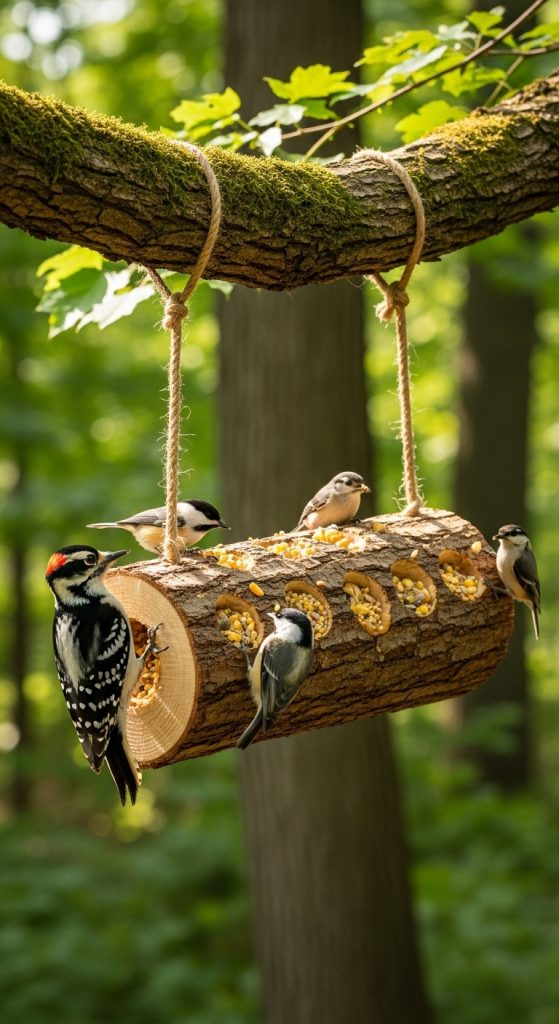
4. Hanging Log Bird Feeder
A hanging log bird feeder uses a natural wooden log to create a rustic design. It blends beautifully with trees and attracts woodpeckers and other forest birds.
For this project, you need a thick wooden log, drill with a large drill bit, rope or metal chain, peanut butter, and bird seeds.
Start by selecting a dry and untreated log. Drill several deep holes into the sides of the log. These holes will hold bird food. Thread a strong rope or chain through the top of the log for hanging.
Fill the drilled holes with a mixture of peanut butter and seeds. This mixture sticks well and provides energy to birds. Hang the log feeder from a strong tree branch.
This feeder is simple and does not require complex carpentry skills. It also uses recycled wood, making it eco friendly. Regularly refill the holes and clean out any old food to prevent mold.
5. Recycled Pallet Wood Bird Feeder
Using pallet wood is a cost effective way to build a bird feeder. Pallets are often available for free and can be reused creatively.
First, inspect the pallet wood carefully. Make sure it is clean and not treated with harmful chemicals. You will need a saw, hammer, nails, screws, sandpaper, and wood glue.
Disassemble the pallet carefully. Cut pieces to create a base, side panels, and roof. Sand all surfaces thoroughly to avoid splinters. Assemble the pieces into a simple feeder shape, either platform style or house style.
Add small drainage holes at the base. If desired, apply a non toxic outdoor sealant. This project allows you to customize the size and design based on available wood pieces.
Recycled pallet feeders are sturdy and environmentally friendly. They give a rustic look to your garden while reducing waste. Make sure to maintain them regularly for long lasting use.

6. Mason Jar and Wooden Frame Feeder
A mason jar combined with a wooden frame creates a practical gravity fed bird feeder. It automatically releases seeds as birds eat.
Materials include a wooden base, wooden frame pieces, mason jar with lid, screws, drill, and sandpaper.
Create a wooden frame that securely holds the mason jar upside down. The base should have a small feeding tray where seeds can collect. Drill a hole in the mason jar lid large enough for seeds to flow slowly.
Attach the jar upside down so that seeds drop into the tray when birds eat. Make sure the jar is tightly secured.
This feeder keeps seeds dry and reduces frequent refilling. It works well for small birds like finches. Clean the jar regularly to prevent moisture buildup. It is both decorative and functional for any garden.

7. Roofed Tray Bird Feeder
A roofed tray bird feeder combines simplicity and protection. It has a flat feeding tray with a raised roof supported by wooden posts.
You will need a wooden base, four wooden dowels or posts, a wooden roof panel, nails, screws, drill, and sandpaper.
Build the tray first by attaching edges around the base. Then attach four vertical posts at each corner. Secure the roof panel on top of the posts. Make sure the roof overhangs slightly to protect seeds from rain.
Drill drainage holes in the base. Sand all surfaces and apply weather resistant sealant. This feeder is ideal for attracting a variety of birds because it provides open access and shelter.
Place it on a pole or hang it from chains. Regular cleaning will keep it safe and attractive for birds throughout the year.

8. Fence Mounted Wooden Bird Feeder
A fence mounted bird feeder is perfect for small backyards. It attaches directly to a wooden fence or wall.
Materials include a wooden base, back panel, side supports, screws, drill, sandpaper, and mounting brackets.
Build a small tray with raised edges. Attach a back panel that will connect to the fence. Secure the feeder using strong screws or brackets.
Make sure the feeder is positioned at a safe height away from predators. Adding a small roof can improve protection from rain.
This design is easy to refill and maintain. It saves space and keeps birds in view. Ensure the fence is stable before mounting the feeder securely.

9. Decorative Gazebo Style Feeder
A gazebo style bird feeder is more decorative and adds beauty to your garden. It resembles a small outdoor pavilion.
You will need wooden panels for the base, posts, and roof, along with screws, drill, wood glue, and sandpaper.
Construct a hexagonal or square base. Attach vertical posts at each corner. Build a slanted roof and secure it firmly on top. Leave open sides for birds to enter freely.
This design requires more woodworking skill but creates a stunning garden feature. Apply a weather resistant finish for durability.
Hang it from a strong hook or mount it on a pole. It attracts many birds while serving as a decorative centerpiece.

10. Multi Level Wooden Bird Feeder
A multi level wooden bird feeder provides several feeding spaces at different heights. It is ideal for attracting various bird species at once.
Materials include multiple wooden boards, vertical supports, screws, drill, and sandpaper.
Create two or three tray levels stacked vertically with space between them. Use wooden supports to hold the levels securely. Make sure each tray has raised edges and drainage holes.
This design allows different bird species to feed without crowding. Larger birds can use lower trays while smaller birds use upper levels.
Apply a protective sealant to prevent weather damage. Place the feeder in a quiet area of your garden. Regular cleaning ensures all levels remain hygienic and safe for birds.
By building any of these wooden bird feeders, you not only create a safe feeding spot for birds but also add natural beauty to your outdoor space. With proper preparation and maintenance, your DIY feeder can last for many seasons.
