Nail art has become a form of self-expression, allowing individuals to display creativity, elegance, and personality through their fingertips. Whether you are a beginner or an experienced nail artist, experimenting with different nail designs can transform your look and add sophistication to your style. In this article, we will explore ten unique nail design inspirations, each explained in detail with material preparation, step-by-step techniques, and tips to achieve professional-looking nails.
Preparation and Materials
Before starting any nail design, proper preparation is essential. Begin with clean, trimmed nails. Push back cuticles gently and buff the surface to remove excess oils, ensuring polish adheres smoothly. Apply a base coat to protect natural nails and extend the longevity of your design.
The materials you will need vary based on the designs, but commonly include:
- Nail polish in multiple colors
- Nail brushes of different sizes for detailing
- Dotting tools for precise patterns
- Nail stickers or decals for quick designs
- Rhinestones, glitter, or embellishments for extra flair
- Top coat for sealing and shine
- Nail file and buffer
- Nail glue for 3D elements
Safety and hygiene are critical, so always use clean tools and avoid harsh chemicals directly on skin.
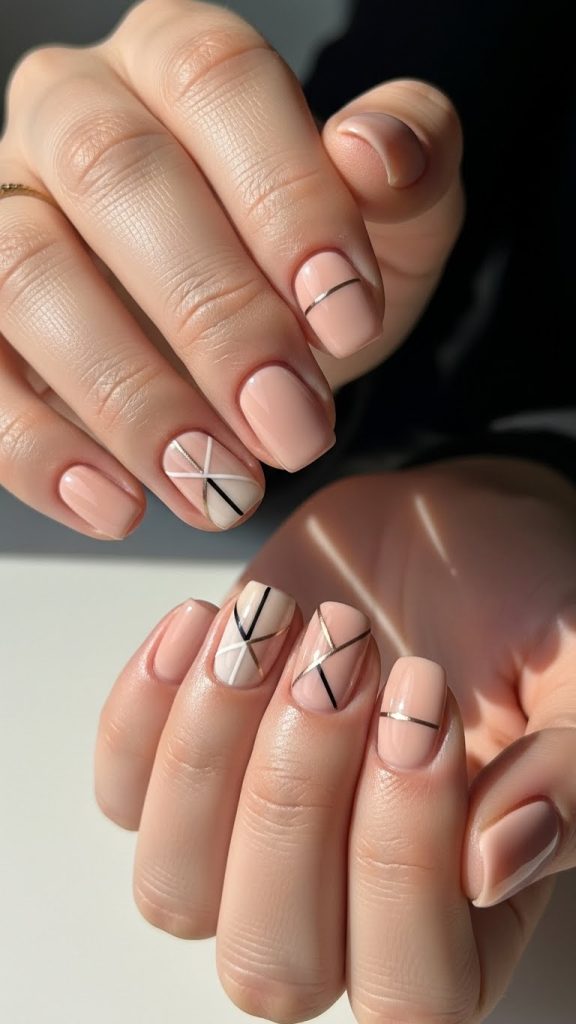
1. Minimalist Nude Nails
Minimalist nude nails offer elegance and simplicity, making them perfect for both casual and formal occasions. The beauty of this design lies in its subtlety and timeless appeal.
Technique: Choose a nude or pastel shade that complements your skin tone. Apply two coats evenly, allowing each coat to dry thoroughly. For added style, create small, delicate patterns using a thin brush or dotting tool. Geometric lines or tiny dots near the nail tip enhance the minimalist look without overpowering it.
Materials Needed: Nude nail polish, thin nail brush, dotting tool, top coat.
Tips: Ensure nails are smooth before applying polish, as nude shades highlight imperfections. Minimalist designs require patience and precision but offer a chic and sophisticated finish. Perfect for everyday wear, this design can also serve as a base for seasonal nail art overlays.
2. French Tip with a Twist
The classic French manicure receives a modern update with a twist on color or design at the tips. This style retains elegance while adding a unique flair.
Technique: Begin with a nude or soft pink base. Instead of traditional white tips, use metallic, glitter, or bold shades to create a distinctive look. You can also experiment with angled, diagonal, or asymmetrical tips for a contemporary touch. Fine brushes or French manicure guides help achieve clean edges.
Materials Needed: Base coat, nail polish in nude and chosen tip color, fine brush or guide, top coat.
Tips: Precision is key. Use thin layers and allow each to dry fully to prevent smudging. French tip variations are versatile, suitable for weddings, parties, or office settings, offering both sophistication and creativity.

3. Ombre Gradient Nails
Ombre nails create a soft, fading effect where colors blend seamlessly from one shade to another. This design is visually striking and can be customized with various color combinations.
Technique: Apply a base coat in the lighter shade. Using a makeup sponge, dab a second, darker color onto the nail, blending it gradually into the base. Repeat until desired gradient intensity is achieved. Finish with a top coat to smooth transitions and add shine.
Materials Needed: Two or more nail polish shades, makeup sponge, base and top coat.
Tips: Patience and blending technique are crucial. Clean up excess polish around nails using a small brush dipped in nail polish remover. Ombre nails are ideal for creative expression, allowing for combinations like pastels, metallics, or seasonal hues.

4. Floral Nail Art
Floral nails bring a touch of nature and femininity to your hands. From delicate daisies to intricate roses, floral designs can be customized for any season.
Technique: Start with a neutral base color. Use a thin brush or dotting tool to paint small flowers, leaves, or stems. Layer colors carefully for depth and detail. For a quicker option, nail stickers or decals provide ready-made floral patterns.
Materials Needed: Nail polish in base and flower colors, thin brush or dotting tool, nail stickers (optional), top coat.
Tips: Floral designs are forgiving; minor imperfections add a hand-painted charm. Experiment with placement on a few accent nails or create a full manicure. Combining floral art with glitter accents can elevate the design further.

5. Glitter Glam Nails
Glitter nails are perfect for celebrations and parties, offering sparkle and glamour. They can be applied fully or as an accent to enhance any design.
Technique: Apply a base coat followed by one or two coats of the chosen color. While still tacky, sprinkle glitter on top or use glitter polish. For precision, apply glitter to tips or as an ombre effect. Seal with multiple layers of top coat to prevent rough texture.
Materials Needed: Base coat, nail polish, glitter or glitter polish, top coat.
Tips: Work over a tray or paper to catch excess glitter. Glitter nails require extra sealing layers for smoothness. Experiment with color combinations for a festive or sophisticated look.

6. Marble Effect Nails
Marble nails mimic the appearance of natural marble stone, offering elegance and a luxurious feel. This design works best with neutral or muted tones but can be bold with bright colors.
Technique: Apply a base coat. On a palette, mix two or three nail polish colors lightly. Using a fine brush or toothpick, create swirling patterns on the nail. Seal with a top coat to enhance the marble effect.
Materials Needed: Base coat, multiple nail polish colors, fine brush or toothpick, top coat.
Tips: Marble designs require creativity and experimentation. Each nail should have a unique pattern, making the manicure distinctive. Use thin coats to avoid thick polish layers that may distort the design.

7. Geometric Nail Art
Geometric nails are characterized by clean lines, shapes, and angles. They offer a modern and artistic look that stands out for its minimalism and precision.
Technique: Begin with a base color. Use tape, stencils, or freehand techniques to create triangles, squares, stripes, or abstract shapes. Finish with a top coat for durability and shine.
Materials Needed: Base coat, nail polish in multiple colors, tape or stencils, thin brush, top coat.
Tips: Patience and precision are essential. Geometric designs can be adapted to any color palette and combined with other styles like glitter or metallic accents for added flair.

8. Matte Finish Nails
Matte nails provide a contemporary, sophisticated look without the shine of traditional polish. They are versatile and can be paired with other textures or designs.
Technique: Apply a base coat followed by two coats of colored polish. Use a matte top coat to achieve the flat, non-glossy effect. For contrast, combine matte nails with glossy tips or glitter accents.
Materials Needed: Base coat, colored nail polish, matte top coat.
Tips: Matte nails are low-maintenance but prone to smudging during application. Allow each layer to dry thoroughly. Matte effects can be used on any nail length and shape, making them versatile for everyday or special occasions.

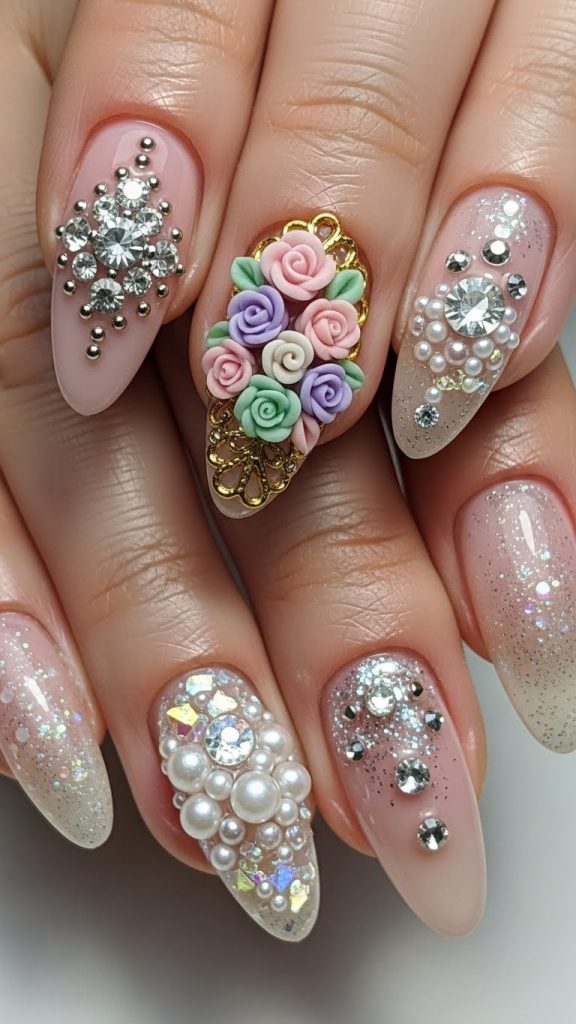
9. 3D Nail Art
Three-dimensional nails use embellishments to add texture and depth, making a striking statement. Designs can include rhinestones, studs, bows, or sculpted clay elements.
Technique: Begin with a base color. Attach rhinestones, studs, or clay designs using nail glue. Press carefully to secure, then apply a top coat around embellishments for durability. Avoid coating 3D elements directly with thick polish to preserve their shape.
Materials Needed: Base coat, colored polish, nail glue, rhinestones or clay decorations, top coat.
Tips: 3D nail art requires patience and precision. Avoid rough handling to prevent embellishments from falling off. This style is ideal for special occasions, photoshoots, or statement nails.
10. Seasonal and Themed Nails
Seasonal or themed nails allow creativity aligned with holidays, events, or personal interests. Popular options include winter snowflakes, autumn leaves, or festive patterns.
Technique: Start with a base coat in a neutral or theme-appropriate color. Use brushes, dotting tools, or stickers to create designs matching the season. Finish with a top coat for a polished look. Rotate themes as desired for fresh inspiration.
Materials Needed: Base coat, nail polish in various colors, brushes or dotting tools, stickers or decals, top coat.
Tips: Themed nails can be simple or intricate. Planning ahead ensures designs are balanced and visually appealing. Combine with accent nails or glitter for added effect.
